Showing posts with label windows 7. Show all posts

Saturday, May 25, 2013

Hide Data Within A Text File WITHOUT using any Software

Have you ever find yourself with too many passwords to remember and no idea where to keep them so that only you can find the password list? Yes, you can use software like Truecrypt, My LockBox and Wise Folder Hider for such purpose, but all these programs requires installation on your PC which is obviously visible to prying eyes.

In today's tutorial I’m going to show you a handy trick to hide textual data within a simple text file without requiring any third-party utility.

1. Click on the Start orb and in the search bar type"cmd" (without quotes). Hit [Enter] to open command prompt. (XP users: click Start, then Run and type "cmd" and hit enter).

2. Navigate to any destination [In our case : C:\Test].

3. Now type the following command in the console :

       notepad PublicFile.txt:password.txt            


Note: You can change PublicFile.txt and password.txt to any other name of your choice. The key point is that there can’t be any spaces between the first filename and the colon.

4. Hit [Enter] and you will be prompted to create a new file.


5. Click "Yes" and enter whatever data you want to hide.


6. Save the file and close Notepad.

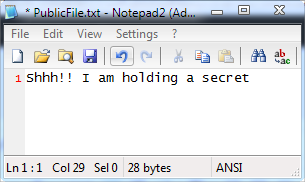
7. Visit the location where you have saved the file. There you will see your non-hidden file. Notice that the main file name is “PublicFile.txt” and there are no clues from the exterior that it contains a hidden file within it.


You can even open up the file by double-clicking on it, and add whatever data you want to make the file look normal.

8. You can also hide more than one text file in the same file. Simply type the command in Step 3 but with a different name after the colon. For example :

       notepad PublicFile.txt:secret.txt        

       notepad PublicFile.txt:confidential.txt    

None of these hidden files will affect the other, or change the main file.


To view hidden data, open command prompt and navigate to the folder where the text file is located. Now type  :

       notepad PublicFile.txt:password.txt         

change the PublicFile.txt and Secret.txt with the names that you used in Step 3 and in Step 8.


If you want to delete all the hidden files from the non-hidden file, you first need to download a small command line application called Streams.exe. Once installed, type the following command in the command window :

       streams.exe -d PublicFile.txt               

where PublicFile.txt is the name of your non-hidden file.

Also Check :

Sunday, July 1, 2012

How to Enable Hidden Disk Cleanup Features in Windows

The Disk Cleanup tool that comes bundled with Windows is a nice basic junk cleaner, but it’s full set of features are hidden by default. It’s capable of much more if you know about the “enhanced” setting that can  turn it into a more powerful version of itself.

Windows Disk Cleanup

To access these extended disk cleanup features, you will need to create a special shortcut. Here’s how:

1. Right-click anywhere on your desktop and select “New” followed by “Shortcut”

2. Paste the following :

%SystemRoot%\System32\cmd.exe /c Cleanmgr /sageset:65535&Cleanmgr /sagerun:65535


3. Click "Next"

4. Enter any name you wish to give to this shortcut (For example : Disk Cleanup PRO) and then click "Finish"

5. Now double-click on the shortcut to launch Disk Cleanup with a greater number of options available to you. Select the options you want to clean up and then click "OK" to begin the cleanup process.

Disk Cleanup with Hidden Options

Note : If you’re unsure what the options mean, simply click on the one and read the description below it.

Also Check :

Tuesday, May 15, 2012

Block Websites in Windows WITHOUT using any Software

Internet is so vast that any information you need is just a mouse click away. Yet the technology that helps us explore and use the web also makes it easy to expose our personal information to others. Hackers and spammers often use this phenomenon to their advantage, creating malicious websites, that when visited, can track your browsing habits, steal your passwords and credit card information, or can infect your computer with malicious softwares such as Viruses, Worms and Trojans.

The easiest way to protect ourselves or our family members from accessing such dangerous websites is to BLOCK them altogether. There are actually many softwares available on the internet which are pretty good in blocking websites on your computer, but they cost money and are sometimes difficult to operate.

In this article I will show you how to block unsafe websites on your Windows PC without investing in any additional software.

Note : Blocking harmful websites is not a complete security solution. It is still recommended that you run anti-virus software on your computer and be careful of the websites you visit.

Here’s the trick :

1. Run Notepad as Administrator : For this go to Start  Start button  > All Programs > Accessories, right-click "Notepad" and select "Run as administrator"  User Account Control permission


Note : If you are prompted for an administrator password or for a confirmation, type the password, or click "Allow" or "Yes"

2. Within Notepad go to File > Open and select  "All Files" from the drop-down menu present near the bottom right corner of the window (check the screenshot).


3. Now type the following text in the "File name" field and click "Open" :

      C:\Windows\System32\drivers\etc\hosts

5.  The "hosts" file will open up. Go to the last line of the file and press the [Enter] key. Type 127.0.0.1 followed by the address of the website that you wish to block. For example, to block facebook.com, type :


Never add “http://” at the start of the URL. Doing so will make the entry invalid. Also note that writing "www" is optional.

6. To block more websites, type 127.0.0.1 followed by the website address in every new line. You can block as many websites as you like.


7. Save and close the file.

Thats it ! Now try to access the offending site(s) from your Web Browser. You’ll see that those specific website(s) will no longer be accessible.

In case you wish to undo the changes, follow Step 1-3 and delete the lines you had typed. You will again be able to open those sites.

Where to find Malicious Websites List ?


You can download customized "Hosts" file from Winhelp2002 (contains a comprehensive list of sites responsible for displaying ads, banners, 3rd party Cookies, 3rd party page counters, web bugs, and other parasites),  Peter Lowe’s Ad-server list (contains a list of ad and banner sites) and Technology Made Easy's Malicious Site List (our very own Hosts file).

Direct Links :

You can also use the software HostsMan to effectively manage your Hosts files

Also Check :

Wednesday, February 29, 2012

Download Original, Official, Legal Windows 7 with SP1 ISO

Situation 1 : You own a branded PC or Laptop that has Windows 7 pre-installed. Rather than giving you a regular Windows 7 CD, you are provided with a recovery disc, using which you can restore your system to its factory configuration -- Windows 7 along with a number of pre-installed junk software.

Situation 2 : Your PC or Laptop came with 32-bit Windows and you want to upgrade to 64-bit, or it came with 64-bit and you need to downgrade to 32-bit for compatibility reasons.

Situation 3 : You have Genuine Windows 7 activation key but lost the DVD to install it from.

If you find yourself in any of the aforementioned situations, we have just the right thing to bring a smile to your face.

Here are links to the various Windows 7 versions from Digital River, Microsoft’s official download partner :


These are legitimate downloads and its completely LEGAL to use them as they don't come with a product key.

Once you finish downloading the ISO file, you can burn the image to a DVD using any DVD burning software and then install Windows 7 using it. Use your own product key to activate Windows.

Note that the product keys don’t distinguish between 32-bit and 64-bit but they do distinguish between editions, so make sure you install whatever edition of Windows 7 your computer has.

Note : These ISO image have Service Pack 1 (SP1) integrated into the installation setup, so there is no need to separately install SP1 after the initial install of Windows 7

Also Check :

Monday, January 23, 2012

Solution : Facebook Authentication Problem in Digsby

For those of you who use Digsby, you may have noticed that both Facebook chat and Facebook notifications fail to authenticate and disconnect quite often. What I'm about to tell you isn't a fix for the actual Facebook chat implementation in Digsby, but it does fix Facebook Chat by letting you access it via the Jabber protocol

Here's the trick :

1) Start Digsby

2) Click on the "Digsby" menu (on the top left of the buddy list)

3) Select "My Accounts"

4) In the "My Accounts" section, click on the icon that looks like a brown light bulb [check the screenshot]


5) Enter the following information :

  • Jabber ID : username@chat.facebook.com

    The "username" is the name in your Facebook address. For example. If your Facebook profile address is www.facebook.com/techmeasy, then type techmeasy@chat.facebook.com in "Jabber ID" field.
    ..
    If you don't already have a username for your Facebook account you can obtain one from the following address. https://www.facebook.com/username/
    ..
  • Password : <your facebook password>

    6) click the Save button.

    That's it. Your Facebook friends should now be showing in Digsby. Also go back to your Digsby "My Account" box, click on the Facebook icon and uncheck the "chat" label to prevent your Facebook friends to show up twice in your buddy list.

    Also Check :

    Tuesday, January 17, 2012

    Open any Folder in Explorer from Command Prompt

    Suppose you have navigated deep into a complex folder structure using command prompt, like this for example

    C:\Users\XXZ\My files\Project\Mega Project\Code\ver 2_2\test24

    and realized that it would be a lot easier if I could just use the mouse for this task. Then, what would you do?

    Well, you can use the command "start" to open a folder in explorer from the DOS command prompt.

    Here's how :

    To open the current folder in Explorer, type the following in the command prompt and press [Enter] :

    start .


    You’ll immediately see an Explorer window to your current folder in your command prompt. Do notice the space and dot after the command.

    To open a directory of your choice from command prompt,  type :

    start <path of the directory>

    For example :

    start C:\ProgramData


    If you want Windows Explorer to open the parent folder of the current location, just type :

    start ..


    Wednesday, January 11, 2012

    Guide to Disable all Ad-based Features in Digsby

    Digsby is one of the best multiprotocol instant messaging client for Windows that lets you chat with all your friends on AIM, MSN, Yahoo, ICQ, Google Talk, and Jabber with one simple to manage interface.

    However, Digsby's greatest nuisance is that it has a number of ad-based features that spam both you and your buddies, and while you can disable them in the preferences, you have to scour it pretty hard to find them all, which is a real pain.

    So, in today's post I will show you how you can disable all the ad-based features in Digsby for once and for all.


    1. Disable random spam in your social feeds :

    • Go to Tools -> Preference -> General & Profile
    • Uncheck “Show trending news articles in social network feeds”


    2. Disable flash ads in the IM window :

    • Go to Tools -> Preference -> Conversations
    • Uncheck "Support Digsby developement with an ad"


    3. Prevent Digsby from spamming your IM status :

    • Go to Tools -> Preference -> Status
    •  Uncheck "Promote Digsby in my IM status messages"


    4. Prevent Digsby from using your computer's processing power when idle :

    • Go to Tools -> Preference ->Research Module
    • Uncheck "Allow Digsby to use CPU time to conduct research after [numeric value] minutes of idle time"


    Thats it!

    Also Check :

    Saturday, December 10, 2011

    Create Super Hidden Files or Folders in Windows WITHOUT any Software


    Making a file or folder hidden in Windows is simple : Right click on the file or folder you want to hide, select "Properties" and on the "General" tab, check the box in the "Attributes" section named "Hidden". Click "OK" and you are done.

    However, the problem with this trick is that its quite old and almost every windows user knows how to get access to hidden folders/files (In case you don't know, you can view hidden files/folders by first opening "My Computer" then selecting Tools > Folder options > View and checking the "Do not show hidden files and folders" box)

    In this tutorial I will show you how to make a super hidden file or folder that you can't find by simply checking "Show hidden files and folders"

    1. Click on the Start orb and in the search bar type"cmd" (without quotes) and hit enter to open command prompt. (XP users: click Start, then Run and type "cmd" and hit enter)

    2. Change the path to the directory in which the file\folder is present

    3. Now type :

                                                            attrib +s +h FolderHide

    Replace “FolderHide” with the name of the folder/file you want to hide.

    Note : If your folder/file has spaces in between, then enclose the folder name in double quotes. For example if the folder name is Folder Hide, then your command should be :

                                                            attrib +s +h "Folder Hide"

    That's it ! Now, go back to the place where the file or folder is located and look, it’s not there! You cannot find it through simply browsing around, through the command prompt, or even if you click “Show Hidden Files and Folders”.


    In this method, what we did is that we altered the file/folder's attributes to Operating System file\folder attribute. This trick works because, by default, the option, "Hide Protected Operating System Files" (in Tools > Folder options > View) is checked.  As normally no one un-checks this option, (as on unchecking, Windows gives a warning detailing why one should not un-check this option), hence the file or folder becomes super hidden. 

    To un-hide the folder or file again, open command prompt and navigate to the folder where the hidden folder is located and type :

                                                            attrib -s -h FolderHide

    Make sure to replace "FolderHide" with the name of the folder or file

    Also Check :
     

    Wednesday, August 17, 2011

    Transform Starter or Home Basic Editions of Windows 7 into Windows 7 Ultimate

    The "Home Basic" and "Starter" editions of Windows 7 are very limited in customization. Support for Aero, the glass like user interface is missing; premium Windows 7 features like Aero Peek, Aero Shake, Aero Snap, Flip 3D are absent; one can't change the desktop wallpaper; in fact you don't even get the "Personalize" option in Desktop context menu to change wallpaper, theme, etc.

    Today I am going to share a small tool which automatically patches system files to enable all Windows Ultimate features in both Windows 7 Home Basic and in Windows7 starter edition. You can download it from here :

    > Aero Patch for Windows 7 Home Basic and Starter Edition

    Download the file and unpack it using 7 Zip or Winrar. Launch "Personalization Panel v1.2.1.exe" which will patch all necessary files and will reboot your system. After reboot, you'll be able to enjoy Aero Glass and other personalization features in Windows 7 Home Basic and Starter editions! You can even use .theme, .themepack and .msstyles files to customize the look and feel of your Windows.

    If you wish to uninstall the patch, simply run the "Personalization Panel v1.2.1.exe" once again.

    Monday, August 1, 2011

    Slow Windows 7 Startup? Too Many Restore Points may be the Reason

    If you find that your Windows 7 is rather slow to start up these days, you may want to check out the number of restore points your computer has. As per this article released by Microsoft, the Windows 7 startup process gets slow when you create many restore points. Reason stated by Microsoft for this is as follows:

    This issue occurs because the boot plan for the ReadyBoot feature exceeds the size limit of 512 kilobytes (KB). Each restore point creates a snapshot of Windows that Volsnap.sys must validate during the startup process. When you create many restore points, the boot plan for the ReadyBoot feature eventually exceeds the size limit of 512 KB, and cannot be stored. Therefore, startup I/O operations are not precached, and the startup process is slow.

    Unfortunately, Microsoft does not give a specific number of how many restore points actually lead to this issue, so it may vary from PC to PC.

    The Solution

    To resolve this issue, you can apply a hotfix from KB2555428 that Microsoft has created to tackle this issue. Do so, only if you are regularly facing this problem as hotfixes are experimental updates that Microsoft pushes out to solve critical customer problems.

    My advice is : get rid of older System Restore points you no longer need. You can use CCleaner to remove System Restore point(s) :

    To remove System Restore points :
    1. In CCleaner, click on the "Tools" icon in the left
    2. Select "System Restore".
    3. Select the System Restore point in the list that you want to remove. Or, use CTRL+Click to select multiple System Restore points.
    4. Click "Remove". You are prompted to confirm the deletion. Click "OK".
    5. To remove other System Restore points, repeat steps 3 to 4.