Monday, September 30, 2013

Revert to Google Chrome's Older "New Tab" Page in 3 Steps

A few days back Google released a new version of Chrome which comes with a redesigned "New Tab" page. The new tab page now sports a large Google logo along with the search box. Like its predecessor, the page displays eight thumbnails of the user's frequently visited pages.

Chrome 29's "New Tabs" Page

Many users, however, are not happy with this change as the redesign doesn't seem to bring anything new to the table. Many, who have gotten into the habit of entering search terms in the address bar, are finding the new search bar redundant and a space hog.

If you are not happy with this change, you can switch back to the old view in just three easy steps:

Step 1 : Type the following in Chrome's address bar (a.k.a the Omnibox) :
                 chrome://flags/#enable-instant-extended-api              
Step 2 : Click on the first drop-down box from the top and set its value "Default" to "Disabled."


Step 3 : Click on the "Relaunch Now" button (present at the bottom of the page) or manually restart Chrome. 

Voila! Chrome's classic tab page is back :)

Chrome's Classic Most Visited Page

Vintage App's Page
 Also check :

Saturday, May 25, 2013

Hide Data Within A Text File WITHOUT using any Software

Have you ever find yourself with too many passwords to remember and no idea where to keep them so that only you can find the password list? Yes, you can use software like Truecrypt, My LockBox and Wise Folder Hider for such purpose, but all these programs requires installation on your PC which is obviously visible to prying eyes.

In today's tutorial I’m going to show you a handy trick to hide textual data within a simple text file without requiring any third-party utility.

1. Click on the Start orb and in the search bar type"cmd" (without quotes). Hit [Enter] to open command prompt. (XP users: click Start, then Run and type "cmd" and hit enter).

2. Navigate to any destination [In our case : C:\Test].

3. Now type the following command in the console :

       notepad PublicFile.txt:password.txt            


Note: You can change PublicFile.txt and password.txt to any other name of your choice. The key point is that there can’t be any spaces between the first filename and the colon.

4. Hit [Enter] and you will be prompted to create a new file.


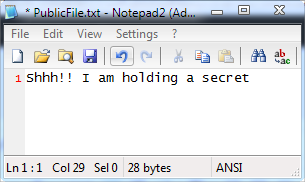
5. Click "Yes" and enter whatever data you want to hide.


6. Save the file and close Notepad.

7. Visit the location where you have saved the file. There you will see your non-hidden file. Notice that the main file name is “PublicFile.txt” and there are no clues from the exterior that it contains a hidden file within it.


You can even open up the file by double-clicking on it, and add whatever data you want to make the file look normal.

8. You can also hide more than one text file in the same file. Simply type the command in Step 3 but with a different name after the colon. For example :

       notepad PublicFile.txt:secret.txt        

       notepad PublicFile.txt:confidential.txt    

None of these hidden files will affect the other, or change the main file.


To view hidden data, open command prompt and navigate to the folder where the text file is located. Now type  :

       notepad PublicFile.txt:password.txt         

change the PublicFile.txt and Secret.txt with the names that you used in Step 3 and in Step 8.


If you want to delete all the hidden files from the non-hidden file, you first need to download a small command line application called Streams.exe. Once installed, type the following command in the command window :

       streams.exe -d PublicFile.txt               

where PublicFile.txt is the name of your non-hidden file.

Also Check :

Wednesday, May 22, 2013

Clipping Magic : Best Online App To Remove Image Backgrounds

There are probably a bunch of different ways to remove backgrounds from an image, but if you are in hurry then try "Clipping Magic", a new web app that does it for you in seconds.

All you have to do is paint the foreground object in green, the background in red and voila! Mission accomplished. Yes, clipping image using this handy app is that easy (and fun).

Head over to the home page of Clipping Magic to try it yourself.

Clipping Magic In Action
 Also Check :

Sunday, May 19, 2013

Enable Facebook's Redesigned News Feed NOW

A few months ago, Facebook unveiled a redesigned news feed to make its often overwhelming stream of updates feel less cluttered. The first thing you will notice about the revamped News Feed is how aesthetically pleasing it is. This UI update, however, is more than just skin deep -- underneath that design is a whole bucket of new features that are just as appealing as the visuals. The feeds now incorporates bigger images, more customization and a consistent experience on mobile and desktop versions.


Facebook's Redesigned News Feed
Facebook's New News Feed

Sadly Facebook is taking a painstakingly slow approach to releasing this remarkably overhauled version of the feeds, as previous updates by the social network giant [such as Timeline and Ticker Feed ] have met with a mixed reception upon release from its users..

However, if you wish to enable this new design right now, simply head over to the Facebook's news feed page, scroll down till the end and click on the "Try the new look" button.

Thursday, July 26, 2012

How to Disable Facebook Timeline


If you don't like the Timeline view, here's how you can disable\deactivate\get rid of it :

Note : The Timeline view gets disabled only in your browser, other people will continue to see your profile as the default Timeline view.

1. Navigate your browser to SocialReviver.net

2. Install the add-on\extension for your browser by clicking on the "Install now" button.
(SocialReviver is available for Firefox, Chrome and Opera)

3. Once installed, head to Facebook.com.

(Optional) 4. Click on the ▼ button present at the top of the page, to the right of the "Home" button and select "SocialReviver Settings" [see screenshot below]


(Optional) 5. You will find a lot of useful features in there, but for now, disable them all as we are only interested in disabling the Timeline view. For that, uncheck every box you see. Also set "Chat Style" as "With Sidebar" and "Chat Tabs Style" as "Classic Style". Click on the "close" button once you are done.


Thats it! Now enjoy browsing Facebook profiles just like you used to.

Result :


Before (Timeline)


After (Timeline disabled)
Also Check :

Tuesday, July 24, 2012

How to Restore Old Gawker Commenting System [Lifehacker, Kotaku, io9]

Over the past few weeks, Gawker Media has begun rolling out a new commenting system, called Kinja, on its network of websites (Kotaku, Jalopnik, Deadspin, Jezebel, Gizmodo, io9, Gawker and Lifehacker). Rather than showing all comments on a given article, Kinja shows only the most interesting thread of comments and replies. Now instead of a long stream of comments, users can choose which threads to read. Gawker Media publisher Nick Denton hopes that this will finally erase the traditional distinctions between writers, editors, readers, subject, and sources.


Although the logic behind Kinja is sound, the implementation is not. The new commenting system is so minimalistic that nothing is intuitive to use. For example, suppose you want to read the comments. Instead of scrolling down, you now have to click through all the replies in a thread.

To counter the new commenting system, one dissatisfied Kotaku commenter has come up with a browser extension\add-on that one can install to restore the commenting system to its former glory.

Download Link : 

Once installed, visit any of the Gawker site and click on the "SHOW ALL (Go Classic!)" link to view all the comments in the good old fashioned way.


Result :


Before
After
Also Check :